Don't miss

Monday, 27 May 2013

How To Root Micromax A25 Smarty easier way


Root Micromax A25 SmartyHello friends if your question is that how to root Micromax A25 Smarty easier way than your search is completely over here without any of your other doubt so please don't waste your time in searching more than easier guide for rooting this smartphone . This guide is 80% trusted .
So I recommend you to apply this guide and if you have any doubt so I am there for you to help you while rooting your smartphone . Some of you have phobia that it is risky in rooting up your phone but it is your sociological feeling . So lets start with the rooting of  Micromax A25 Smarty easier way .


                  How To Root Micromax A25 Smarty easier way

Requirements :-

1) Micromax A25 

2) Rooting Tool Kit ( Click Me )

3) Unlock Root ( Click Me ) 

4) USB 

Steps :-

1) First of all you need to download the rooting tool kit the link is available on the top .

2) Now , Go to the Settings>>applications>>development and tap for the USB debugging option.

3) Then you need to extract the rooting tool kit that you have downloaded . 

4) Now you need to Extract SP Flash Tool zip file and run the file named Flash-Tool.

5) This will show the screen like below one.

6) Go to the menu bar of you phone and then click on options and then enable USB mode . If it is already ticked then leave it as it is and move to the next step .

SP Flash Tool-1

7) You need to find the Scatter-loading option on the right hand side of the current tool window.
SP Flash Tool-2

8) When you click on Scatter it starts loading , it will ask you the location of Scatter loading file. Extract the modifiedboot.img.zip and select the text file present over there.

9) Now you need to click on the Bootimg and browse to the modified boot.img file. It is present in the same folder as the scatter file. (The boot.img that is present in the outer folder is the original boot.img, flash it back if you face some problem).Select the  Unsecured Boot Image  that you have extractedSP Flash Tool-3

10) Now connect your USB cable with your PC without attaching your phone with it just attach it .

11) Now, click the Download Button in the Flash Tool. Message will arouse “searching” which will appear in the lower panel.

12) Then you need to switch your phone off and then connect it with the USB i.e attached to your PC . 

13) Extract the’ A25_usb_vcom_drivers’ folder.

14) Go to device manager and install the drivers by right clicking on your device and selecting the appropriate options. When it ask you the location of the driver, head over to the A25_usb_vcom_Drivers. 

15) SP Flash Tool will generate some error now, ignore it. Detach your device and go back to Step 11 

16) When you connect your phone back, the downloading will start and the progress will be visible from a progress bar in the lower part, again you will see a message that you have been successfully flashed the files.
SP Flash Tool-4

17) Then finally disconnect your phone with your PC and now reboot it . 

18) Now install unlock root that you have downloaded if not then do it because the link is just on the top .

19) Then you need to connect the device again to the PC 

20) Now you need to press the root button present in the unlock root application that you have installed .

21) Now finally reboot your smartphone or Micromax A25 smarty .

22) Finally You  Are Done With The Rooting Of Micromax A25 Smarty .

If you any have query or happy with the result please give your feedback through comments a\or by using Write For Us link . 

Note - Rooterzz is not responsible for any of the damage caused while rooting so please be carefull while rooting your smartphone .




Thursday, 23 May 2013

How to Root Samsung Galaxy Music Easier Way


Hello friends today A am here with the latest and the easiest guide for Samsung Galaxy Music . It is a trusted guide and used by many people if you got stucked at any place than I am there for you to help you . So this is an awesome phone with its cheap range and having many more features . As it is not a herculean task for new people using android . Just you need to follow the given steps properly so lets start now with the rooting of Samsung Galaxy Music.


How to Root Samsung Galaxy Music


Before Rooting :-

1) Your data is precious first of all you need to backup your phone contacts, messages and etc etc.

2) Then you need to enable USB debugging on you device for that you need to go to the Settings < Applications <  Development < USB debugging . Remember  checkbox beside USB Debugging should be ticked.

3) You need to charge up you device more than 80% because if you phone gets off while the process of rooting it may brick you phone . So charge it up .

4) You will have to disable security apps and programs like Antivirus and Firewall from your device for the time being i.e. Until the rooting procedure has completed.

5) Download USB drivers for your android device  to make it compatible with Windows.

6) Friends now you need to download USB Drivers ( Click Me ) and Root Tool ( Click Me ) from this links to your computer . Now install drivers on your PC so that you have all the necessary drivers for rooting .  Extract the “Root Tool” into a folder onto the desktop.

7) Now you have the material or you can say software to root up your android device .

Steps :- 

1) First of all you need to connect you smartphone to your PC .

2) Now, from the folder where you have extracted the “Root Tool”, double-click on “RunMe.bat” file to launch it.


3) Then the application starts running, it will ask you that which type you want to run, it is advised that you select “Normal” entering “1”.

4)  Now, follow all the on-screen instructions you see to successfully root your device.

Thats all you have finally rooted your smartphone or Samsung Galaxy Music.

If you have any query please comment below I will be pleased to answer you question .

Note - Rooterzz is not responsible for any of the damage caused while rooting so please be carefull while rooting your smartphone .


Wednesday, 22 May 2013

How to Root Samsung Galaxy Pop Easier way


Hey friends today I am going to tell you that how to root your samsung Galaxy Pop easier than provided by other sites . This is a trusted guide and used by many people . So apply this guide carefully if you got stucked then don't worry I am there to help you . So don't think just apply this guide . But if you brick your phone than I am not responsible for your damage cause so this very carefully . So lets start with the rooting of Samsung Galaxy Pop Easier way .


           How to Root Samsung Galaxy Pop Easier way 

Before Rooting :- 

1) Keep this in mind that this guide is made for rooting only samsung galaxy pop S5570 if you apply this on any of your other smartphone then it may brick the other phone so be carefull ..

2) Ensure that you have installed the USB drivers on your PC properly before rooting your device .

3) Then enable USB debugging mode . Go to options < applications < development < USB debugging 

4) Backup all you phone Applications , Contacts , Messages etc.

5) Make sure that your phone's battery is more than 80% charged because if your phone gets off while the process of rooting it will brick the phone .

Steps :-

1) First you need to download the Root Package do not very link is just here ( Click Me ) now update the file on your PC

2) Now copy that file on your SD card . As it is recommended that you copy the file in your SD card .

3) Now switch your phone off .

4) You need to boot your phone into download mode. To do so, press and hold, Home + Power button until you see Download Mode Screen.
Note-Use volume keys to navigate through menu and Power/Home key to select an option while you are in Download mode.


5) Now select ” Apply update from SD card” from the download mode menu.

6) Then browse to the “ update.zip ” file that you copied to your SD card in step 2.

7) Now when the process is completed, your phone will restart automatically. If it doesn’t restart automatically, then in the recovery Mode menu, select “Reboot system now“.

You have rooted your smartphone easier way than other sites.

Note - Rooterzz is not responsible for any of the damage caused while rooting so please be carefull while rooting your smartphone .


Saturday, 18 May 2013

How to Root Micromax A35 Bolt Easier Way


Hello today I am going to tell that how to root Micromax A35 Bolt easier way than provided by this guide is really awesome and had been created in the simplest language which might made you understand . This guide is 99.9% trusted I am sure this will not disappoint you at all . As this is a awesome phone because with the bestest responce of bolt they have launched this phone so please don't waste your time I search of more than easier guide on other guides because this is the easiest guide . So enough of chit chat lets start with the rooting of Micromax A35 Bolt easier way .


                                   Requirements:

  • Micromax A35 Mobile Handset : Make Sure your Battery is charged
  • Original USB Cable : For connecting the device with PC
  • USB Drivers : Drivers are automatically installed when you connect your phone for the first time. Just connect the phone without activating any special mode like USB Storage, etc. 
  • Rooting Tool : Download Rooting Tool

Procedure :

  • Connect your Micromax A35 to your computer using the USB Cable
  • Enable USB Debugging Mode on your phone as follows :
    Go to Settings-> Development-> USB Debugging. Now check on “USB debugging” option.
  • Open the Rooting Tool which you have downloaded and extract it on your computer.
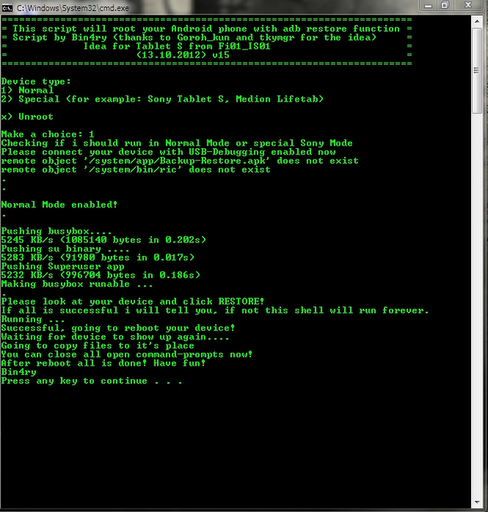
  • Check the extracted files, and double-click the RunMe.bat file which you will find inside it. It will open a command window as shown below :
  • Select option “1″ to initiate the rooting process in Normal Mode. Follow the progress in the command screen.
  • Finally, you will be prompted to tap the screen of your phone. After tapping, the handset will be rooted at once, and a message will be displayed that “Rooting is Successful”.
  • You will need to manually Reboot the handset. After booting up, you will find theSuperUser app in your phone.
And thats it you have done without any risk 
If you have any query related to this topic you can contact me :) 
Note - Rooterzz is not responsible for any of the damage caused while rooting so please be carefull while rooting your smartphone .

Friday, 17 May 2013

How to Root Karbonn A1 Titanium


If you got tired in the search of that how to Root Karbonn A1 Titanium then your search is over here . No need to roam around in search for more than better guides for rooting your android device . This is a trusted guide used by many users so please don't waste your time just apply this guide properly in the given steps properly if you done something went wrong it may brick your phone so please do it on your own risk . So lets start with the rooting of Karbonn A1 Titanium.


                             How to Root Karbonn A1 Titanium

Requirements:

  • Karbonn S1 Mobile Handset : Make Sure your Battery is charged
  • ClockworkMod Recovery : CWM should be installed in your phone for this procedure. If you haven’t installed CWM, please do so using this simple guide : CWM Recovery For Karbonn S1 Titanium

Procedure :

  • Copy the downloaded SuperUser zip package to your phone’s SD card.
  • Now turn off your phone and enter the CWM Recovery.
  • Navigate using the volume keys and power button.
  • Choose the SuperUser zip file from the file menu and confirm to install it.
  • Installation will complete shortly, and show you the result when succeeded.
  • Choose the reboot system option from CWM menu.
  • After booting up, you will find the SuperUser app in your phone.

And you have rooted your smartphone . :)
Note - Rooterzz is not responsible for any of the damage caused while rooting so please be carefull while rooting your smartphone .

How to Root Micromax A27 Bolt


Hey friends today I am going to tell you about that how to root your Micromax A27 Bolt . This is a trusted guide so apply this on your smartphone and I am sure that you will get a perfect responce . This guide is very easy if you use this guide in a proper manner so please don't try to find more than easier guide and wasting your time searching on other sites . So lets start with the rooting of Micromax A27 bolt


Specifications :- 

It has a  1GHZ processor Digital Camera Android 2.3 Gingerbread Bring alive your entertainment with the rich multimedia technology of the Android Gingerbread. Get a streamlined user interface that is easy to navigate along with a faster, more intuitive text input. Save battery with an enhanced application and power management. Download all your favorite applications with the preinstalled Google play store!


  • Micromax A27 Mobile Handset : Make Sure your Battery is charged
  • Original USB Cable : For connecting the device with PC
  • Drivers are automatically installed when you connect your phone for the first time. Just connect the phone without activating any special mode like USB Storage, etc. Wait for few minutes and then you will be presented with an setup to install the required drivers. Wait for it to complete. When you connect your phone the next time, you will see that all drivers will be installed one by one. It might take 2-3 minutes to complete until it says “Finished installing new device”.
    Alternatively, you can download your drivers from here : Micromax A27 USB Drivers

Steps To Root :- 
  • Connect your Micromax A27 to your computer using the USB Cable
  • Enable USB Debugging Mode on your phone as follows :
    Go to Settings->Development->USB Debugging. Now check on “USB debugging” option.
  • Let the drivers be installed automatically or install them manually from the driver package mentioned above.
  • Install UnlockRoot which you have downloaded on your computer.
  • Open UnlockRoot, you will see a window like the one shown below :
  • Click the large green button saying Root and select your phone model from the the popup that is displayed
  • You might get to see some prompts, just ignore those.
  • The rooting procedure begins, it takes about 2-3 minutes. Do not use the phone or disconnect it.
  • Once completed, your phone will reboot automatically. After booting up, you will find the SuperUser app in your phone.

Thats it you have finally rooted your smartphone with the easiest method than provided by other sites 
Note - Rooterzz is not responsible for any of the damage caused while rooting so please be carefull while rooting your smartphone .

Tuesday, 14 May 2013

How to Root HTC Butterfly X920D


Is this you are searching that how to Root HTC Butterfly X920D then your search is over here because today I am going to tell you that how to root it in an easier manner so don't worry just follow the given steps in the guide properly please otherwise it may brick your phone . So please be carefull while rooting . So lets start with the rooting of  HTC Butterfly X920D easier way than other sites .


                     How to Root HTC Butterfly X920D 

Requirements

1 HTC butterfly X920D

2 Charged Butterfly X920D, because while doing anything if it stopped, then it can be worst case scenario. It should be charged upto 70%.

3 Root tools - click here

4 TWRP recovery, it is used to flash roms, mods but here we will use to root HTC butterfly x920D. There are many recovery's like clockworkmod, amon-ra etc but its great recovery with very nice Ui. 

Steps :- 

Install custom recovery (CWM) on X920 by clicking here.

2 Reboot to TWRP recovery by pressing volume Down and power buttons simultaneously, soon you will be in fastboot menu. Navigate to recovery (by volume buttons) and then press powerbutton (to select).

3 When you will be booted to TWRP recovery, tap on "install", locate to su_buzyb0x.zip and select it.

4 Swipe it to confirm that to flash.

5 Click Reboot.

6 Done.

7 When you will be in android's UI, you will see superuser application. If you still think that your device is NOT rooted then you can also check with 3rd party applications like Root Checkerapplication, available at google play store.

Note - Rooterzz is not responsible for any of the damage caused while rooting so please be carefull while rooting your smartphone .

How to root Micromax A89 easier way


Hey friends today my topic is to tell you to that how to root your Micromax A89 easier way than provided by the other sites . It is a very nice phone with many features like this device has 4 inches of WVGA screen. Most of micromax devices rolls with 256 MB which makes phone useless but this phone comes with 512 MB ram which increases your multitasking, gaming experience. So my point is to start rooting as fast as possible so lets start with it . 


                            How to Root Micromax A89 

Requirements:
2) Micromax A89
3) USB

Steps :- 

1  Download Bin4ry Rooting Tools and unpack it in any folder.

2 Enable USB debugging on Micromax A89 by- Settings>Applications>Development>Usb debugging (tick it). 

3 Now, connect your Micromax A89  to your computer or laptop (do not mount SDcard while connecting).

4 Drivers would install it-self if it does not it may display you to install. If it does not display follow this guide- Click ME

5 After installing drivers of micromax a89, open Place where you extracted Bin4ry Rooting toolkit (Folder name could be anything, it depends on what you named, stock name is "Root_script_by_Bin4ry_v17". 

Open file 'RunMe.bat'.

RunMe

7 It will open command prompt which will consist of the script, now choose normal mode ( enter ) and hit enter for rooting micromax a89.

RunMe1

8 It will root your micromax a89 and follow on screen instructions. Your Micromax A89 might root 1-2 times while rooting your Micromax A89 because it needs to install superuser APK and some files. So please kindly, wait.

9 Rooted your Micromax A89 

Note - Rooterzz is not responsible for any of the damage caused while rooting so please be carefull while rooting your smartphone .

How to Root Micromax A68 easier way


If your question is that how to root Micromax A68  4.0 easier way then the sollution is just here . As with the great responce of Ninja series Micromax had launched a new and cheap phone i.e Micromax A68 Smarty 4.0 . It is a great phone with many specification . As you have all seen I give the phone discription and its qualities to readers because I wanted you all to know about the phone before rooting . As my all guides are in simple language that I might think you would be understand it . So lets start with the rooting of Micromax A68 4.0 . 
                       
           How to Root Micromax A68 easier way

Requirements:- 

Bin4ry Rooting Toolkit,            Bin4ry Rooting Toolkit XDA thread(on first post)

2 Micromax A68 4.0 Smarty.


3 Micromax A68's Battery charged upto 75%

 Download .Android (its on .rar).

 Extract android.rar in C:>Users>YourUserName and Reboot your computer. 

Steps :-

1 Enable USB debugging in android by going, settings>Developer options>USB debugging, enable USB 
debugging check box.

2 Download, unpack Bin4ry Rooting Toolkit into 1 folder

3 Double Click (Run): RunMe.bat
 skyneel-root
(Note: Open RunMe.bat not RunMe.sh)


4 Press "1" when launched, (Normal Mode) to root micromax a68 4.0 smarty.skyneel-rooted

5 It will automatically root your micromax a68 4.0 smarty.

6 When done, press any key .

7 Rooted your Micromax A68 

Note - Rooterzz is not responsible for any of the damage caused while rooting so please be carefull while rooting your smartphone .